编写loader和插件
loader 的链式调用和执行顺序
loader 的定义:loader 是一个导出为函数的 JavaScript 模块。
module.exports = function(source) {
  return source;
}
多 loader 的执行顺序:多个 loader 是串行执行的,前一个 loader 执行完成的结果传递给后一个 loader,并且顺序从后到前。
为什么 loader 的执行顺序是从后到前的?
函数组合的两种做法:
Unix 中的 pipline
Compose(webpack采取的是这种),
compose = (f, g) => (...args) => f(g(...args))。g() 的执行结果传递给 f()。
使用 loader-runner 进行 loader 调试
loader-runner 允许在不安装 webpack 的情况下运行 loaders。
作用:
作为 webpack 的依赖,webpack 内部也是使用它来执行 loader。
进行 loader 的开发的调试。
loader-runner 的使用:
import { runLoaders } from 'loader-runner';

runLoaders({
  resource: '/abs/path/to/file.txt?query', // String: 资源的绝对路径(可以增加查询字符串)
  loaders: ['/abs/path/to/loader.js?query'], // String[]: loader 的绝对路径(可以增加查询字符串)
  context: { minimize: true }, // 基础上下文之外的额外 loader 上下文
  readResource: fs.readFile.bind(fs), // 读取资源的函数
}, function(err, result) {
  // err: Error?
  // result.result: Buffer | String
};)
开发一个 raw-loader。
安装 loader-runner:npm install loader-runner@3.0.0 -S。
// src/raw-loader.js
module.exports = function (source) {
  const json = JSON.stringify(source)
    .replace('foo', '')
    .replace(/\u2028/g, '\\u2028') // 为了安全起见,ES6模板字符串的问题
    .replace(/\u2029/g, '\\u2029');

  return `export default ${json}`;
};
// src/demo.txt
foobar
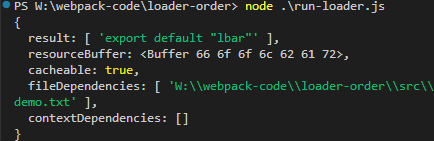
使用 loader-runner 调试 loader:
// run-loader.js
const { runLoaders } = require('loader-runner');
const fs = require('fs');
const path = require('path');

runLoaders({
  resource: path.join(__dirname, './src/demo.txt'),
  loaders: [
    path.join(__dirname, './src/raw-loader.js'),
  ],
  context: {
    minimize: true,
  },
  readResource: fs.readFile.bind(fs),
}, (err, result) => {
  err ? console.log(err) : console.log(result);
});
运行查看结果:node run-loader.js。
更复杂的 loader 开发场景
loader 获取参数
通过 loader-utils 的 getOptions 方法获取 loader 的参数。
安装 loader-utils 依赖。
npm install loader-utils@1.2.3
配置里面给 loader 传递参数。
const { runLoaders } = require('loader-runner');
const fs = require('fs');
const path = require('path');

runLoaders({
  resource: path.join(__dirname, './src/demo.txt'),
  loaders: [
    {
      loader: path.join(__dirname, './src/raw-loader.js'),
      // loader 的参数
      options: {
        name: 'testName',
      },
    },
  ],
  context: {
    minimize: true,
  },
  readResource: fs.readFile.bind(fs),
}, (err, result) => {
  err ? console.log(err) : console.log(result);
});
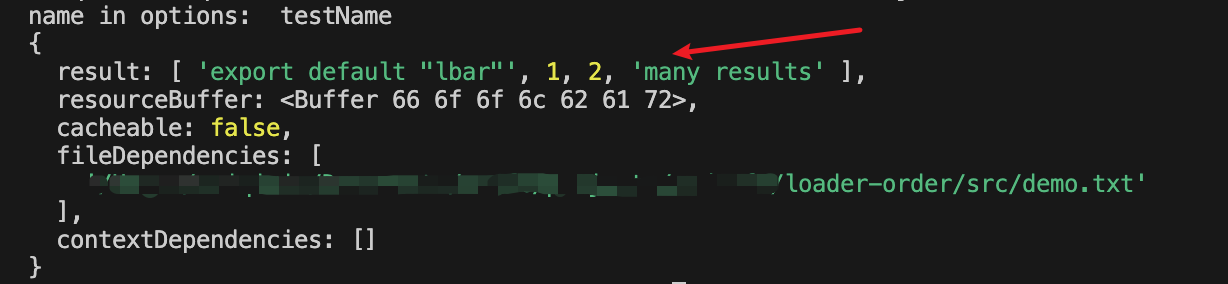
编写 loader 的时候调用 getOptions 方法获取参数。
const loaderUtils = require('loader-utils');

module.exports = function(source) {
  const options = loaderUtils.getOptions(this);
  console.log(options.name);
}
loader 异常处理
方式一:loader 内部直接抛出一个错误。
方式二:调用 this.callback() 方法传递错误,方法第一个参数传递错误,第二个参数传递返回结果。
this.callback(err: Error | null, content: string | Buffer, sourceMap?: SourceMap, meta?: any)
module.exports = function(source) {
  const json = JSON.stringify(source)
    .replace(/\u2028/g, '\\u2028') // 为了安全起见,ES6模板字符串的问题
    .replace(/\u2029/g, '\\u2029');

  // 方式一:直接抛出Error
  // throw new Error('test error');

  // 方式二:调用this.callback传递错误
  this.callback(new Error('test error'), json);
}
loader 返回结果
loader 返回结果有两种方式:同步处理、异步处理。
同步处理,调用 this.callback() 方法。异步处理,调用 this.async() 方法返回的 callback 函数。
先看同步处理,之前在 raw-loader 中,是直接返回 json 字符串。
module.exports = function(source) {
  const json = JSON.stringify(source)
    .replace(/\u2028/g, '\\u2028') // 为了安全起见,ES6模板字符串的问题
    .replace(/\u2029/g, '\\u2029');

  return `export default ${json}`;
}
这其实也是一种同步处理的方式,不过不太标准,标准的是使用 this.callback() 方法。没有错误处理,第一个参数传递 null,第二个参数把返回结果传递进去。
而且,使用 this.callback() 方法,可以返回多个结果。
module.exports = function(source) {
  const json = JSON.stringify(source)
    .replace(/\u2028/g, '\\u2028')
    .replace(/\u2029/g, '\\u2029');

  this.callback(null, `export default ${json}`);
  // this.callback返回多个结果
  this.callback(null, `export default ${json}`, 1, 2, 'many results');
}
接下来看异步处理,异步处理,需要调用 this.async() 方法,返回一个 callback 函数。传参和 this.callback() 一样。
const loaderUtils = require('loader-utils');
const path = require('path');
const fs = require('fs');

module.exports = function (source) {
  // this.async返回异步处理函数
  const callback = this.async();
  fs.readFile(path.join(__dirname, './async.txt'), 'utf-8', (err, data) => {
    if (err) {
      callback(err, '');
      return;
    }
    // 异步处理结果
    callback(null, data, 'async usage');
  });
};
loader 同步异步处理混用
情况一:在同步情况中,调用异步处理函数,是没有问题的。
// 在同步情况中,调用异步处理函数
module.exports = function(source) {
  const json = JSON.stringify(source)
    .replace(/\u2028/g, '\\u2028')
    .replace(/\u2029/g, '\\u2029');

  const callback = this.async();
  callback(null, `export default ${json}`, 1, 2, 'many results');
}
情况二:在异步情况中,调用同步处理函数,会报错 Error: callback(): The callback was already called.。
猜测是同步处理的 this.callback() 方法,在 loader 的末尾其实也是会隐式调用的,所以等读取文件操作完成后,再调用就会报错重复调用。
如果只调用异步处理的 this.async() 方法,就会阻断这个隐式调用。
// 在异步情况中,调用同步处理函数
const loaderUtils = require('loader-utils');
const path = require('path');
const fs = require('fs');

module.exports = function (source) {
  fs.readFile(path.join(__dirname, './async.txt'), 'utf-8', (err, data) => {
    this.callback(null, data, 'async usage666');
  });
};

情况三:同时调用同步和异步处理函数,也会报错 Error: callback(): The callback was already called.。
这两个不能同时调用。
const loaderUtils = require('loader-utils');
const path = require('path');
const fs = require('fs');

module.exports = function (source) {
  fs.readFile(path.join(__dirname, './async.txt'), 'utf-8', (err, data) => {
    this.callback(null, data, 'async usage666');
  });
  this.callback(null, 'sync usage');
};
loader 输出文件
loader 通过调用 this.emitFile() 方法,将内容输出为文件。通常回和 loaderUtils.interpolateName() 方法结合使用。
loaderUtils.interpolateName() 方法功能是,根据文件内容、和其它参数生成一个唯一的文件名。
this.emitFile 文件输出的路径就是 webpack 配置 output.path 指定的目录。
const loaderUntils = require('loader-utils');

module.exports = function(source) {
  // index.a3fs.js
  const fileName = loaderUntils.interpolateName(this, '[name].[hash:4].[ext]', source)
  this.emitFile(fileName, source);
  return source;
}
评论留言
- loader-utils 3.0.0 版本已经移除getOptions方法,详见:https://github.com/webpack/loader-utils/blob/master/CHANGELOG.md
开发自动合成雪碧图的loader
支持的语法:
.img1 {
  background: url(./images/logo.jpg?__sprite);
}
.img2 {
  background: url(./images/logo.png?__sprite);
}
/* 变成 */
.img1 {
  background: url(./images/sprite.png);
}
如何将两张图片合为一张?使用 spritesmith。
使用示例:
const Spritesmith = require('spritesmith');
const fs = require('fs');
const path = require('path');

const sprites = ['./loaders/images/logo.jpg', './loaders/images/logo.png'];

Spritesmith.run({ src: sprites }, (err, result) => {
  // 合成后图片的buffer数据
  console.log(result.image);
  // 每张图片的左上角坐标信息
  console.log(result.coordinates);
  // 合成后图片的大小
  console.log(result.properties);
  fs.writeFileSync(path.join(__dirname, './loaders/images/sprite.png'), result.image);
});
![]()
开始编写 sprite-loader.js。
const Spritesmith = require('spritesmith');
const fs = require('fs');
const path = require('path');

module.exports = function (source) {
  const callback = this.async();
  // 匹配出所有带有 __sprite 后缀的css语句
  const imgs = source.match(/url\((\S*)\?__sprite/g);
  const matchedImgs = [];

  for (let i = 0;i < imgs.length;i++) {
    const img = imgs[i].match(/url\((\S*)\?__sprite/)[1];
    // 截取每张图片的路径,并且拼成绝对路径
    matchedImgs.push(path.join(__dirname, img));
  }

  Spritesmith.run({
    src: matchedImgs
  }, (err, result) => {
    fs.writeFileSync(path.join(process.cwd(), 'dist/sprite.jpg'), result.image);
    // 将css图片的路径替换为合成后的图片路径
    source = source.replace(/url\((\S*)\?__sprite/g, (match) => {
      return `url("dist/sprite.jpg"`;
    });
    // 修改css文件内容
    fs.writeFileSync(path.join(process.cwd(), 'dist/index.css'), source);
    callback(null, source);
  });
}
// run-loader.js
const { runLoaders } = require('loader-runner');
const fs = require('fs');
const path = require('path');

runLoaders({
  resource: path.join(__dirname, './loaders/index.css'),
  loaders: [
    path.join(__dirname, './loaders/sprite-loader.js'),
  ],
  context: {
    minimize: true,
  },
  readResource: fs.readFile.bind(fs),
}, (err, result) => {
  if (err) {
    console.log(err);
  } else {
    console.log(result);
  }
});
.img1 {
  background: url(./images/logo.jpg?__sprite);
}
.img2 {
  background: url(./images/logo.png?__sprite);
}
运行完成后,index.css 文件内容变为如下,并且生成了合并后的图片。
.img1 {
  background: url("dist/sprite.jpg");
}
.img2 {
  background: url("dist/sprite.jpg");
}
插件基本结构介绍
插件没有像 loader 那样的独立运行环境,只能在 webpack 里面运行。
插件的基本结构如下,插件是一个导出为类的模块,并且类里面一定要有一个 apply 方法。
module.exports = class MyPlugin {
  apply(compiler) {
    compiler.hooks.done.tap('MyPlugin', (stats) => {
      console.log('MyPlugin');
    })
  }
}
插件的运行环境:在 webpack 配置的 plugins 参数中加入插件。
const MyPlugin = require('./plugins/my-plugin');

module.exports = {
  plugins: [new MyPlugin()],
}
更复杂的插件开发场景
插件中如何获取参数
通过插件的构造函数获取。
module.exports = class MyPlugin {
  constructor(options) {
    this.options = options;
  }
  apply(compiler) {
    console.log('MyPlugin', this.options);
  }
}
module.exports = {
  plugins: [new MyPlugin({ name: 'zhangsan' })],
}
插件的错误处理
在参数校验阶段,可以直接 throw 一个 error 出来,
throw new Error('Error Message')。比如校验到参数的数据类型不对,或者参数名称不对等。可以通过 compilation 对象的 warnings 和 errors 接收。
compilation.warnings.push('warning message');
compilation.errors.push('error message');
通过Compilation进行文件写入
webpack 的 emit 文件输出阶段,会把 compilation 对象上的 assets 属性的内容进行输出,因此把要输出的内容挂载到 compilation.assets 上即可。
文件写入需要使用 webpack-sources。
const { RwaSource } = require('webpack-sources');

module.exports = class DemoPlugin {
  constructor(options) {
    this.options = options;
  }
  apply(compiler) {
    const { name } = this.options;
    compiler.hooks.emit.tapPromise('DemoPlugin', (compilation, callback) => {
      // 比如如果要输出代码,就可以使用RawSource
      compilation.assets[name] = new RawSource(name);
    })
  }
}
插件扩展-编写插件的插件
插件自身也可以通过暴露 hooks 的方式进行自身扩展,以 html-webpack-plugin 为例。
html-webpack-plugin-alter-chunks(Sync)
html-webpack-plugin-alter-asset-tags(Sync)
开发压缩构建资源为zip包的插件
要求:
生成的 zip 包,文件名称可以通过插件参数传入。
需要使用 Compiler 对象上特定的 hooks 进行资源生成,而不是使用 fs 等文件读写库。
准备知识:如何将文件压缩为 zip 包?使用 jszip。
使用示例:
const zip = new JSZip();

zip.file("Hello.txt", "Hello World\n");

const img = zip.folder("images");
img.file("smile.gif", imgData, {base64: true});

zip.generateAsync({type:"blob"}).then(function(content) {
  // see FileSaver.js
  saveAs(content, "example.zip");
});
Compiler 上负责文件生成的 hooks 是 emit,是一个异步的 hook。emit 文件生成阶段,读取的事 compilation.assets 对象的值。因此可以把 zip 资源包设置到 compilation.assets 对象上。
// zip-plugin.js
const JSZip = require('jszip');
const path = require('path');
const RawSource = require('webpack-sources').RawSource;

const zip = new JSZip();

module.exports = class ZipPlugin {
  constructor(options) {
    this.options = options;
  }

  apply(compiler) {
    compiler.hooks.emit.tapAsync('ZipPlugin', (compilation, callback) => {
      // 创建一个 zip 文件夹
      const folder = zip.folder(this.options.filename);
      for (const filename in compilation.assets) {
         const source = compilation.assets[filename].source();
        //  将文件内容写入到 zip 文件夹中
         folder.file(filename, source);
      }
      zip.generateAsync({
        // 指定生成的内容类型
        type: 'nodebuffer',
      }).then((content) => {
        compilation.assets[this.options.filename + '.zip'] = new RawSource(content);
        // callback一定要调用,否则不会生成文件。通知webpack异步任务已完成。
        callback();
      })
    });
  }
};