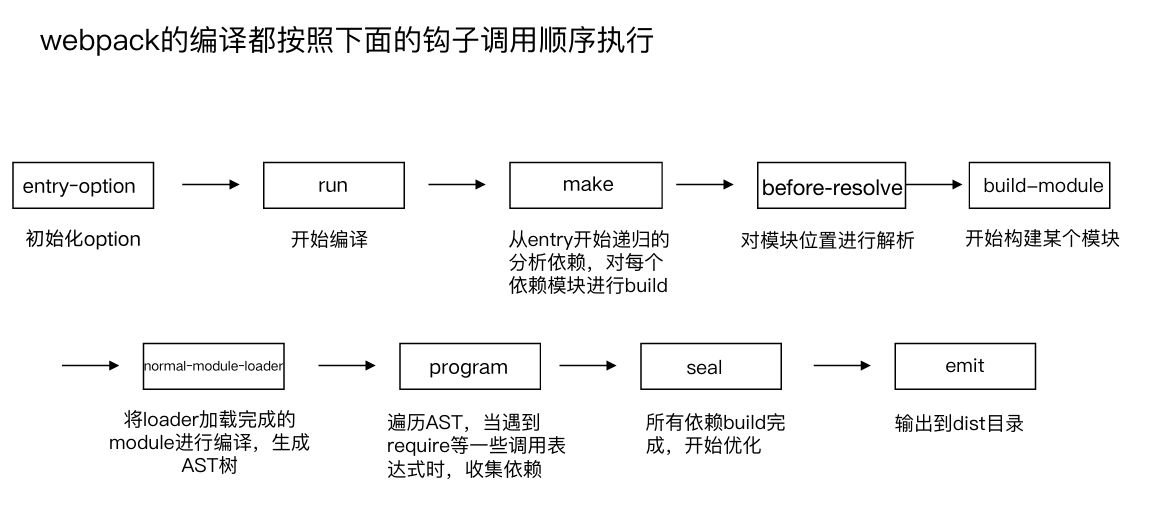
通过源码掌握webpack打包原理
webpack启动过程分析
从运行 webpack 打包命令说起。
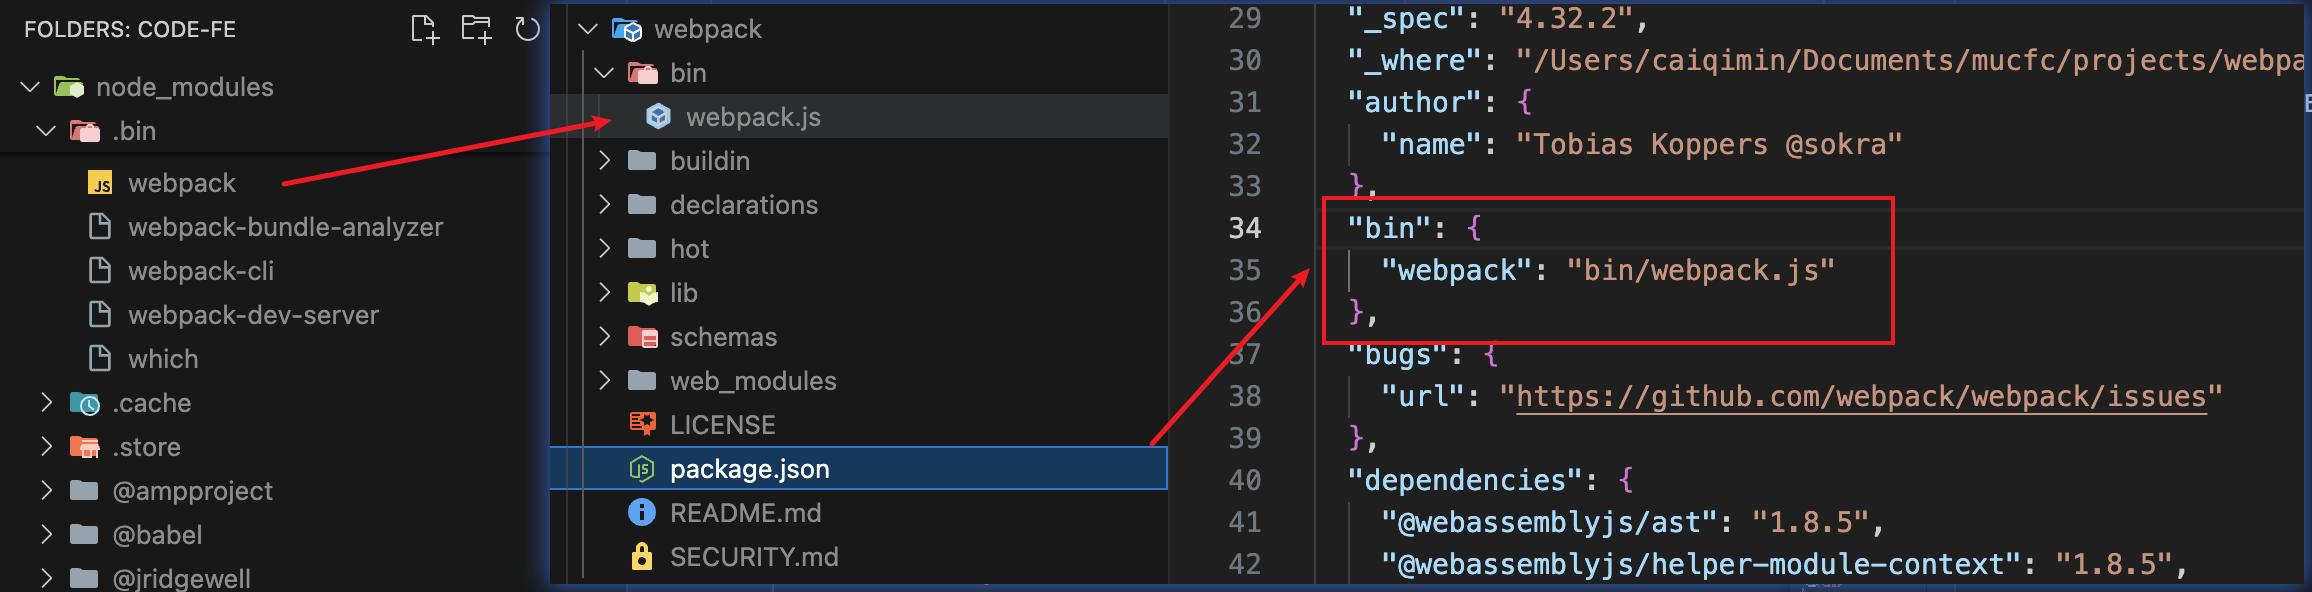
当我们执行 npm run build 命令或者直接在控制台执行 npx webpack --config webpack.prod.js 命令时,命令行工具会去寻找 node_modules/.bin 目录是否存在 webpack 文件,如果存在,则执行 webpack 文件,否则报错。
而 node_modules/.bin 目录下的 webpack 文件,是一个软链接文件,它的源文件是 node_modules/webpack/bin/webpack.js 文件。
npm 包要在 package.json 文件中声明 bin 字段,才会在 node_modules/.bin 目录下生成软链接文件。
分析webpack入口文件
webpack 命令执行的入口文件是 node_modules/webpack/bin/webpack.js 文件。
// webpack.js

// @ts-ignore
process.exitCode = 0;

/**
 * @param {string} command process to run
 * @param {string[]} args commandline arguments
 * @returns {Promise<void>} promise
 */
const runCommand = (command, args) => {
	const cp = require("child_process");
	return new Promise((resolve, reject) => {
		const executedCommand = cp.spawn(command, args, {
			stdio: "inherit",
			shell: true
		});

		executedCommand.on("error", error => {
			reject(error);
		});

		executedCommand.on("exit", code => {
			if (code === 0) {
				resolve();
			} else {
				reject();
			}
		});
	});
};

/**
 * @param {string} packageName name of the package
 * @returns {boolean} is the package installed?
 */
const isInstalled = packageName => {
	try {
		require.resolve(packageName);

		return true;
	} catch (err) {
		return false;
	}
};

const CLIs = [
	{
		name: "webpack-cli",
		package: "webpack-cli",
		binName: "webpack-cli",
		alias: "cli",
		installed: isInstalled("webpack-cli"),
		recommended: true,
		url: "https://github.com/webpack/webpack-cli",
		description: "The original webpack full-featured CLI."
	},
	{
		name: "webpack-command",
		package: "webpack-command",
		binName: "webpack-command",
		alias: "command",
		installed: isInstalled("webpack-command"),
		recommended: false,
		url: "https://github.com/webpack-contrib/webpack-command",
		description: "A lightweight, opinionated webpack CLI."
	}
];

const installedClis = CLIs.filter(cli => cli.installed);

if (installedClis.length === 0) {
	const path = require("path");
	const fs = require("fs");
	const readLine = require("readline");

	let notify =
		"One CLI for webpack must be installed. These are recommended choices, delivered as separate packages:";

	for (const item of CLIs) {
		if (item.recommended) {
			notify += `\n - ${item.name} (${item.url})\n   ${item.description}`;
		}
	}

	console.error(notify);

	const isYarn = fs.existsSync(path.resolve(process.cwd(), "yarn.lock"));

	const packageManager = isYarn ? "yarn" : "npm";
	const installOptions = [isYarn ? "add" : "install", "-D"];

	console.error(
		`We will use "${packageManager}" to install the CLI via "${packageManager} ${installOptions.join(
			" "
		)}".`
	);

	const question = `Do you want to install 'webpack-cli' (yes/no): `;

	const questionInterface = readLine.createInterface({
		input: process.stdin,
		output: process.stderr
	});
	questionInterface.question(question, answer => {
		questionInterface.close();

		const normalizedAnswer = answer.toLowerCase().startsWith("y");

		if (!normalizedAnswer) {
			console.error(
				"You need to install 'webpack-cli' to use webpack via CLI.\n" +
					"You can also install the CLI manually."
			);
			process.exitCode = 1;

			return;
		}

		const packageName = "webpack-cli@3.3.2";

		console.log(
			`Installing '${packageName}' (running '${packageManager} ${installOptions.join(
				" "
			)} ${packageName}')...`
		);

		runCommand(packageManager, installOptions.concat(packageName))
			.then(() => {
				require(packageName); //eslint-disable-line
			})
			.catch(error => {
				console.error(error);
				process.exitCode = 1;
			});
	});
} else if (installedClis.length === 1) {
	const path = require("path");
	const pkgPath = require.resolve(`${installedClis[0].package}/package.json`);
	// eslint-disable-next-line node/no-missing-require
	const pkg = require(pkgPath);
	// eslint-disable-next-line node/no-missing-require
	require(path.resolve(
		path.dirname(pkgPath),
		pkg.bin[installedClis[0].binName]
	));
} else {
	console.warn(
		`You have installed ${installedClis
			.map(item => item.name)
			.join(
				" and "
			)} together. To work with the "webpack" command you need only one CLI package, please remove one of them or use them directly via their binary.`
	);

	// @ts-ignore
	process.exitCode = 1;
}
文件的主要内容如下:
process.exitCode = 0; // 设置默认的退出码为0,表示正常执行
const runCommand = (command, args) => {...}; // 定义运行命令的函数
const isInstalled = packageName => {...}; // 判断某个包是否安装
const CLIs = [...]; // webpack 可用的CLI:webpack-cli和webpack-command
const installedClis = CLIs.filter(cli => cli.installed); // 判断是否安装过webpack-cli和webpack-command
// 根据安装数量进行相应处理
if (installedClis.length === 0) {...} // 都没安装,会提示用户进行安装
else if (installedClis.length === 1) {...} // 安装了其中一个,就会执行这个包package.json的bin字段指向的文件
else {...} // 两个都安装了,会报错,提示只能安装一个
因此,执行 webpack 命令最终执行的是 webpack-cli (或者 webpack-command) 命令。
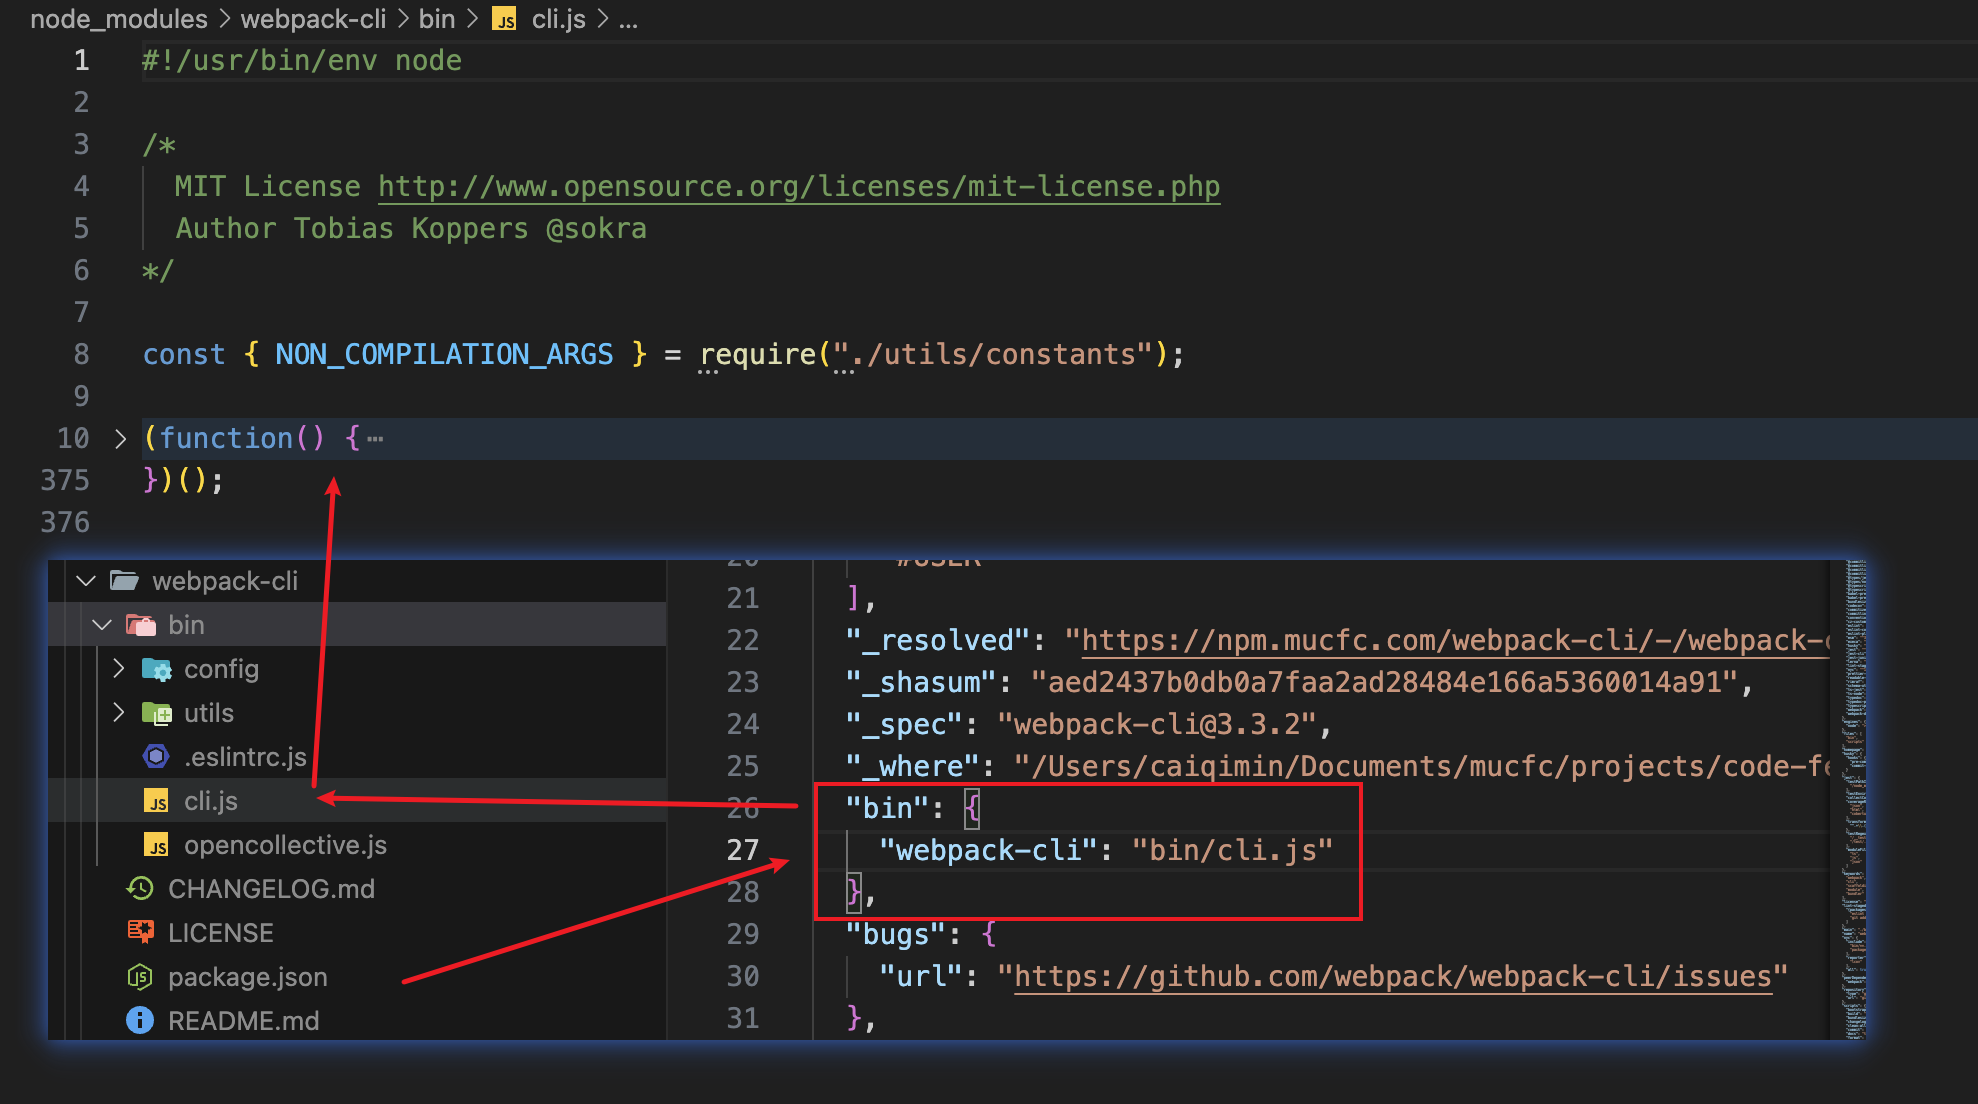
webpack-cli源码阅读
首先给出结论,webpack-cli 主要做了以下三件事:
引入 yargs,对命令行进行控制
分析命令行参数,对各个参数进行转换,组成编译配置项
引用 webpack,根据配置项进行编译和构建
分析不需要编译的命令
并不是所有命令都需要经过编译构建的过程,并不会实例化一个 webpack 对象,比如 webpack init。NON_COMPILATION_ARGS 就保存着不需要经过编译的命令。
// node_modules\webpack-cli\bin\cli.js
const { NON_COMPILATION_ARGS } = require("./utils/constants");

const NON_COMPILATION_CMD = process.argv.find(arg => {
	if (arg === "serve") {
		global.process.argv = global.process.argv.filter(a => a !== "serve");
		process.argv = global.process.argv;
	}
	return NON_COMPILATION_ARGS.find(a => a === arg);
});

if (NON_COMPILATION_CMD) {
	return require("./utils/prompt-command")(NON_COMPILATION_CMD, ...process.argv);
}
// 运行这8个命令不会实例化webpack对象,而是直接运行
const NON_COMPILATION_ARGS = [
	"init", // 创建一份webpack配置文件
	"migrate", // 进行webpack版本迁移
	"add", // 往webpack配置文件中添加属性
	"remove", // 从webpack配置文件中删除属性
	"serve", // 运行webpack-serve
	"generate-loader", // 生成webpack loader代码
	"generate-plugin", // 生成webpack plugin代码
	"info" // 返回与本地环境相关的一些信息
];
当输入了 NON_COMPILATION_ARGS 里面的命令,就会直接加载 /utils/prompt-command 文件,执行命令。文件的主要内容如下:
module.exports = function promptForInstallation(packages, ...args) {
	const nameOfPackage = "@webpack-cli/" + packages;
	let packageIsInstalled = false;
	let pathForCmd;
	try {
		const path = require("path");
		const fs = require("fs");
		pathForCmd = path.resolve(process.cwd(), "node_modules", "@webpack-cli", packages);
		if (!fs.existsSync(pathForCmd)) {
			// 局部没有找到,就去全局找
			const globalModules = require("global-modules");
			pathForCmd = globalModules + "/@webpack-cli/" + packages;
			require.resolve(pathForCmd);
		} else {
			require.resolve(pathForCmd);
		}
		packageIsInstalled = true;
	} catch (err) {
		packageIsInstalled = false;
	}
	if (!packageIsInstalled) {
		...

		const question = `Would you like to install ${packages}? (That will run ${commandToBeRun}) (yes/NO) : `;

		console.error(`The command moved into a separate package: ${nameOfPackage}`);
		...
	} else {
		return runWhenInstalled(packages, pathForCmd, ...args);
	}
};
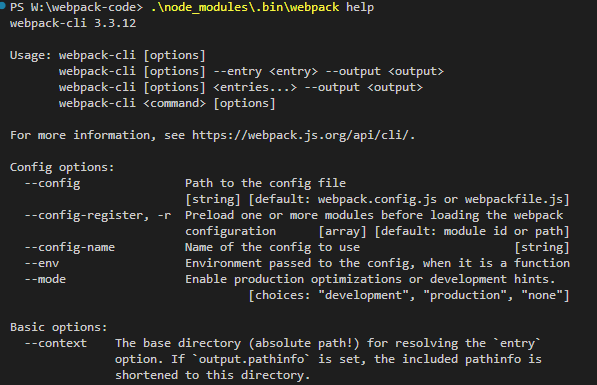
prompt-command 首先会查找是否安装了 @webpack-cli/xxx 对应的包,如果安装了就直接运行。如果没有安装,就提示用户是否要安装。
运行 .\node_modules\.bin\webpack serve 命令结果如下。

webpack-cli 使用 yargs 分析命令
yargs 是命令行工具包,用于提供命令和分组参数,动态生成 help 帮助信息。
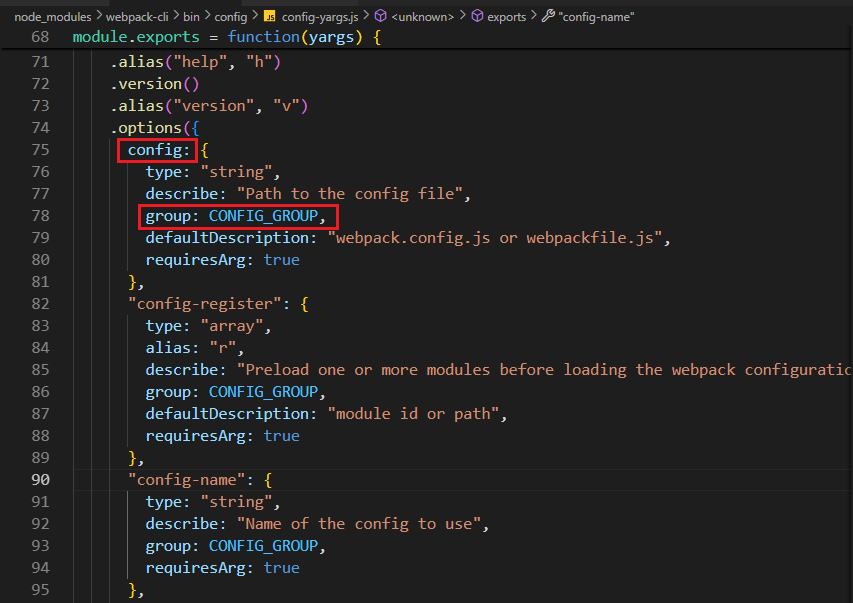
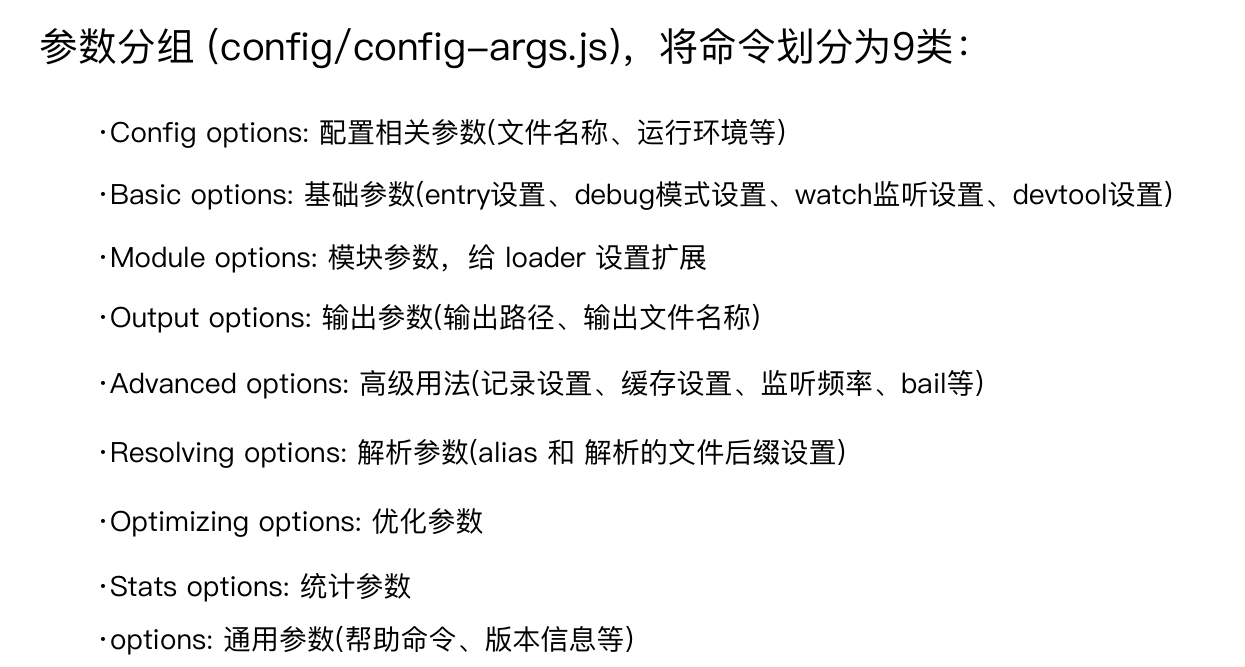
其中很重要的一个内容就是 group,区分每个命令的分组。GROUPS 存放在 node_modules\webpack-cli\bin\utils\constants.js 文件下。
除了这 8 组特殊命令,其余命令都放在 Options 之下,因此 webpack 一共有 9 类命令。
// node_modules\webpack-cli\bin\utils\constants.js
const CONFIG_GROUP = "Config options:";
const BASIC_GROUP = "Basic options:";
const MODULE_GROUP = "Module options:";
const OUTPUT_GROUP = "Output options:";
const ADVANCED_GROUP = "Advanced options:";
const RESOLVE_GROUP = "Resolving options:";
const OPTIMIZE_GROUP = "Optimizing options:";
const DISPLAY_GROUP = "Stats options:";
const GROUPS = {
	CONFIG_GROUP,
	BASIC_GROUP,
	MODULE_GROUP,
	OUTPUT_GROUP,
	ADVANCED_GROUP,
	RESOLVE_GROUP,
	OPTIMIZE_GROUP,
	DISPLAY_GROUP
};
组装webpack配置参数options
修改webpack配置项有两种方法:1. 在webpack.config.js中修改;2. 在命令行中修改。
webpack-cli 接下来就会组装 webpack 配置,根据配置项加载对应的插件,保存到 options 变量之中,最后传递给 processOptions 方法。
yargs.parse(process.argv.slice(2), (err, argv, output) => {
	let options;
	try {
		options = require("./utils/convert-argv")(argv);
	} catch (err) {
		...
	}
})
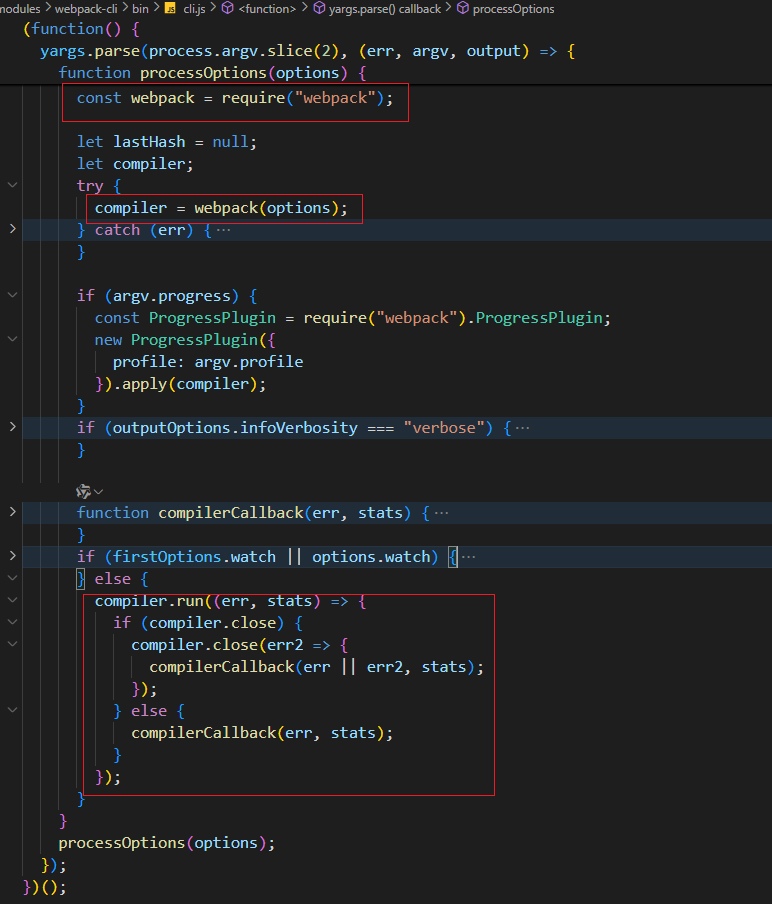
最后阅读 processOptions 函数。
processOptions 会创建一个 outputOptions 变量,表示输出的配置,根据传入的 options 参数进行组装,options 是输入的配置。
最后就是引入 webpack,创建 compiler 对象,根据是否配置 watch 参数来决定执行哪种构建方式,没有 watch 就执行 compiler 的 run 方法,启动构建过程。
webpack-cli执行的结果
webpack-cli 对配置文件和命令行参数进行转换最终生成配置选项参数 options,最终会根据配置参数实例化 webpack 对象,然后执行构建流程。
Tapable插件架构和Hooks设计
webpack 两个核心对象 Compiler 和 Compilation 都是继承 Tapable,所以要重点分析 Tapable。
Tapable 是什么
Tapable 是一个类似于 Node.js 的 EventEmitter 的库, 主要是控制钩子函数的发布与订阅,控制着 webpack 的插件系统。
其实和 Taro 的 Events 事件机制有些类似,可以理解为事件的监听和触发。
webpack 在构建过程中会触发不同的 Hook,插件会监听 Hook,当 Hook 被触发时,就会执行相应的回调函数,从而在不同的阶段做不同的事情。
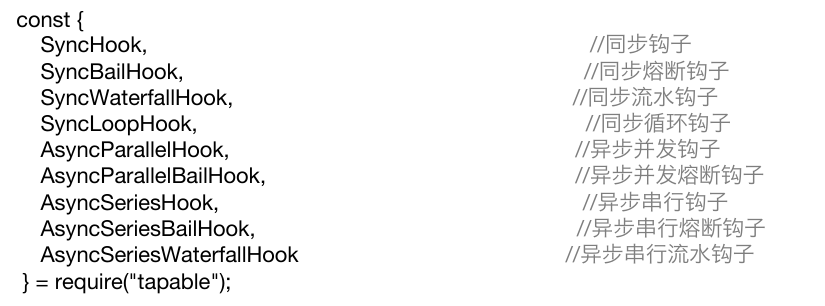
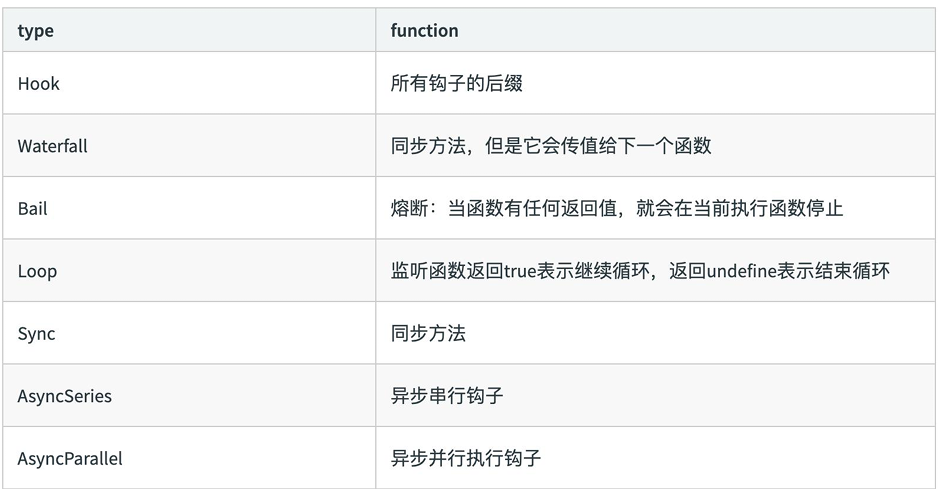
Tapable 库暴露了很多 Hook(钩子)类,为插件提供挂载的钩子。每个钩子代表一个关键事件节点,类似于生命周期。
Tapable 的使用
Tapable 提供了绑定同步、异步钩子的方法,以及同步和异步钩子的执行事件方法。
绑定钩子,相当于监听事件,event 的 on 方法;执行钩子,相当于触发事件,event 的 emit 方法。
| Async* | Sync* |
|---|---|
| 绑定:tapAsync/tapPromise/tap | 绑定:tap |
| 执行:callAsync/promise | 执行:call |
基本用法示例:
const { SyncHook } = require('tapable');

const hook1 = new SyncHook(["arg1", "arg2", "arg3"]);
// 订阅hook,为hook绑定回调函数
// 这个名称只是一个标识,hook1.call后两个回调都会执行
hook1.tap('hook1', (arg1, arg2, arg3) => console.log(arg1, arg2, arg3));
hook1.tap('hook2', (arg1, arg2, arg3) => console.log(arg1, arg2, arg3));
// 执行hook绑定的回调
hook1.call('arg1', 'arg2', 'arg3');
实际例子:
const {
  SyncHook,
  AsyncSeriesHook,
} = require('tapable');

class Car {
  constructor() {
    this.hooks = {
      accelerate: new SyncHook(['newspeed']),
      brake: new SyncHook(),
      calculateRoutes: new AsyncSeriesHook(['source', 'target', 'routesList']),
    };
  }
}

const myCar = new Car();

// 绑定同步钩子
myCar.hooks.brake.tap('WarningLampPlugin', () => console.log('WarningLampPlugin'));

// 绑定同步钩子 并传参
myCar.hooks.accelerate.tap('LoggerPlugin', newSpeed => console.log(`Accelerating to ${newSpeed}`));

// 绑定一个异步Promise钩子
myCar.hooks.calculateRoutes.tapPromise('calculateRoutes tapPromise',
  (source, target, routesList, callback) => new Promise((resolve, reject) => {
    setTimeout(() => {
      console.log(`tapPromise to ${source} ${target} ${routesList}`);
      resolve();
    }, 1000);
  }));

myCar.hooks.brake.call();
myCar.hooks.accelerate.call(10);

console.time('cost');

// 执行异步钩子
myCar.hooks.calculateRoutes.promise('Async', 'hook', 'demo').then(() => {
  console.timeEnd('cost');
}, (err) => {
  console.error(err);
  console.timeEnd('cost');
});
在 Node.js 16.16.0 版本,tapable 1.1.3 版本中,上述代码的运行结果是:
WarningLampPlugin
Accelerating to 10
tapPromise to Async hook demo
cost: 1.006s
如果把绑定异步钩子的方法改为 myCar.hooks.calculateRoutes.tapPromise,则运行结果变为如下,有顺序差别。
WarningLampPlugin
Accelerating to 10
cost: 1.187ms
tapPromise to Async hook demo
Tapable 如何与 webpack 关联起来的
阅读 node_modules\webpack\lib\webpack.js 的如下代码。
可以得到两个结论:
webpack 插件需要有一个 apply 方法,接受 compiler 参数。
插件会对 compiler 的 Hooks 进行监听,当 Hooks 触发时,插件就会执行相应的操作。
let compiler;
if (Array.isArray(options)) {
	compiler = new MultiCompiler(
		Array.from(options).map(options => webpack(options))
	);
} else if (typeof options === "object") {
	options = new WebpackOptionsDefaulter().process(options);

	compiler = new Compiler(options.context);
	compiler.options = options;
	new NodeEnvironmentPlugin({
		infrastructureLogging: options.infrastructureLogging
	}).apply(compiler);
	if (options.plugins && Array.isArray(options.plugins)) {
		for (const plugin of options.plugins) {
			if (typeof plugin === "function") {
				plugin.call(compiler, compiler);
			} else {
				plugin.apply(compiler);
			}
		}
	}
	compiler.hooks.environment.call();
	compiler.hooks.afterEnvironment.call();
	// 注入webpack内部的插件
	compiler.options = new WebpackOptionsApply().process(options, compiler);
}
下面是模拟代码。
模拟 Compiler。
// Compiler.js
const {
  SyncHook,
  AsyncSeriesHook,
} = require('tapable');

module.exports = class Compiler {
  constructor() {
    this.hooks = {
      accelerate: new SyncHook(['newspeed']),
      brake: new SyncHook(),
      calculateRoutes: new AsyncSeriesHook(['source', 'target', 'routesList']),
    };
  }

  run() {
    this.accelerate(10);
    this.break();
    this.calculateRoutes('Async', 'hook', 'demo');
  }

  accelerate(speed) {
    this.hooks.accelerate.call(speed);
  }

  break() {
    this.hooks.brake.call();
  }

  calculateRoutes() {
    this.hooks.calculateRoutes.promise(...arguments).then(() => {
    }, (err) => {
      console.error(err);
    });
  }
};
插件 my-plugin.js。真实的 Compiler 会有一百多个 Hook,插件其实一般只需要监听一两个。
// my-plugin.js
const Compiler = require('./Compiler');

class MyPlugin {
  constructor() {}

  apply(compiler) {
    compiler.hooks.brake.tap('WarningLampPlugin', () => console.log('WarningLampPlugin'));
    compiler.hooks.accelerate.tap('LoggerPlugin', newSpeed => console.log(`Accelerating to ${newSpeed}`));
    compiler.hooks.calculateRoutes.tapPromise('calculateRoutes tapAsync', (source, target, routesList) => new Promise((resolve, reject) => {
      setTimeout(() => {
        console.log(`tapPromise to ${source} ${target} ${routesList}`);
        resolve();
      }, 1000);
    }));
  }
}
模拟插件执行。
const myPlugin = new MyPlugin();

const options = {
	plugins: [myPlugin]
}

// 创建compiler对象
const compiler = new Compiler();

// 调用插件的apply方法,使其监听compiler的Hooks
for (const plugin of options.plugins) {
	if (typeof plugin === "function") {
		plugin.call(compiler, compiler);
	} else {
		plugin.apply(compiler);
	}
}

// 执行compiler的run方法,其中在关键时刻会触发对应的Hooks
compiler.run();
webpack流程:准备阶段
下面学习 webpack 的整个流程,从 webpack 启动,到文件生成,具体做了哪些事情。
webpack 的关键流程节点如下:
Compilation 主要负责模块的编译、打包和优化过程。
首先学习 webpack 流程第一阶段:准备阶段。
let compiler;
if (Array.isArray(options)) {
	compiler = new MultiCompiler(
		Array.from(options).map(options => webpack(options))
	);
} else if (typeof options === "object") {
	// 对 webpack 的 options 配置进行默认值处理,设置默认的参数。
	options = new WebpackOptionsDefaulter().process(options);

	compiler = new Compiler(options.context);
	compiler.options = options;
	new NodeEnvironmentPlugin({
		infrastructureLogging: options.infrastructureLogging
	}).apply(compiler);
	if (options.plugins && Array.isArray(options.plugins)) {
		for (const plugin of options.plugins) {
			if (typeof plugin === "function") {
				plugin.call(compiler, compiler);
			} else {
				plugin.apply(compiler);
			}
		}
	}
	compiler.hooks.environment.call();
	compiler.hooks.afterEnvironment.call();
	compiler.options = new WebpackOptionsApply().process(options, compiler);
}
接着是 new NodeEnvironmentPlugin({ infrastructureLogging: options.infrastructureLogging }).apply(compiler);,调用 NodeEnvironmentPlugin 插件。
NodeEnvironmentPlugin 插件监听 beforeRun 钩子,这个钩子节点在 entry-option 和 run 之间,主要负责做一些清空缓存的工作。
class NodeEnvironmentPlugin {
	constructor(options) {
		this.options = options || {};
	}

	apply(compiler) {
		...
		compiler.hooks.beforeRun.tap("NodeEnvironmentPlugin", compiler => {
			if (compiler.inputFileSystem === inputFileSystem) inputFileSystem.purge();
		});
	}
}
module.exports = NodeEnvironmentPlugin;
初始化 option 的钩子 entryOption 其实是在 node_modules\webpack\lib\WebpackOptionsApply.js 文件里触发的。
WebpackOptionsApply 的作用是将所有的配置 options 参数转换成 webpack 内部插件,同时也会使用默认的插件列表。
output.library -> LibraryTemplatePlugin
externals -> ExternalsPlugin
devtool -> EvalDevToolModulePlugin, SourceMapDevToolPlugin
AMDPlugin, CommonJSPlugin, RemoveEmptyChunksPlugin
node_modules\webpack\lib\EntryOptionPlugin.js 的 EntryOptionPlugin 插件,会监听 entryOption 的钩子,负责将 entry 配置项进行转换。
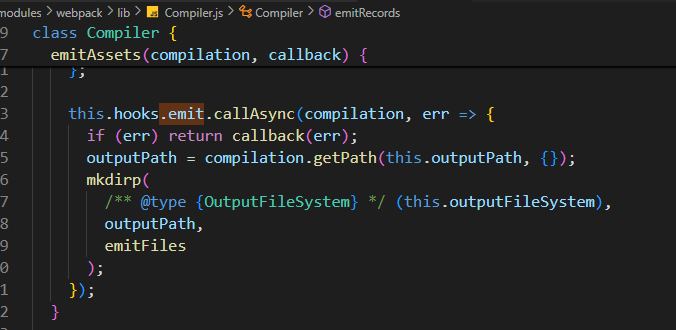
接下来阅读 Compiler 的 run 方法。
run(callback) {
	...
	const onCompiled = (err, compilation) => {
		if (err) return finalCallback(err);

		// 触发 shouldEmit 钩子
		if (this.hooks.shouldEmit.call(compilation) === false) {
			...
		}

		// 执行 emitAssets 函数,传入 compilation,进行构建环节了
		this.emitAssets(compilation, err => {
			...
		});
	};

	// 触发 run 钩子前先触发 beforeRun 钩子
	this.hooks.beforeRun.callAsync(this, err => {
		if (err) return finalCallback(err);

		// 触发 run 钩子,执行 onCompiled 方法
		this.hooks.run.callAsync(this, err => {
			if (err) return finalCallback(err);

			this.readRecords(err => {
				if (err) return finalCallback(err);

				this.compile(onCompiled);
			});
		});
	});
}
webpack 流程:模块构建和chunk生成阶段
Compiler Hooks:
流程相关:(before-)run、(before-/after-)compile、make、(after-)emit、done。
监听相关:watch-run、watch-close。
Compiler 调用 Compilation 生命周期方法:
addEntry -> addModuleChain
finish(上报错误模块)
seal
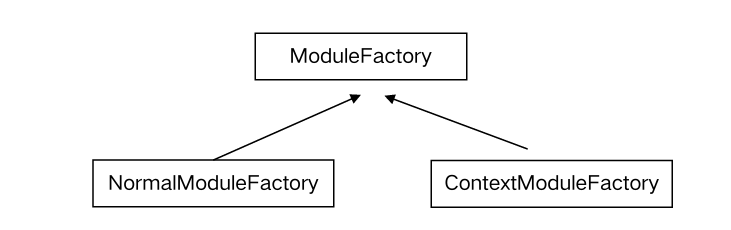
Compiler 会创建两个工厂对象,这两个都继承于 ModuleFactory。
平时写的 module.exports = function () {},就是 NormalModuleFactory,普通模块,可以直接 import 模块名 导入的。
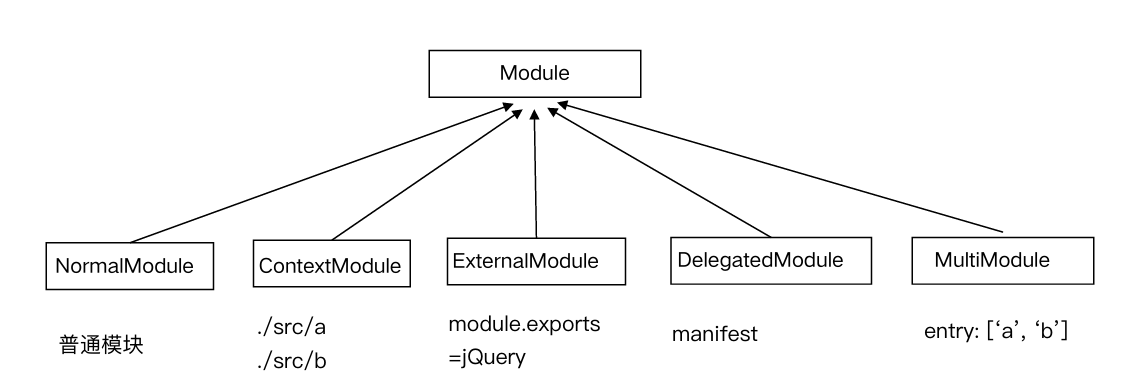
webpack 支持解析的模块类型:
Compilation 相关 Hooks:
模块相关:build-module、failed-module、succeed-module。
资源生成相关:module-asset、chunk-asset。
优化相关:(after-)seal、optimize、optimize-modules(-basic/advanced)、after-optimize-modules、optimize-chunk-modules。
chunk 生成算法:
webpack 将 entry 中对应的 module 都生成一个新的 chunk。
遍历 module 的依赖列表,将依赖的 module 也加入到 chunk 中。
如果一个依赖 module 是动态引入的模块(比如 require、动态import),那么就会根据这个 module 创建一个新的 chunk,继续遍历依赖。
重复上面过程,直到得到所有的 chunks。
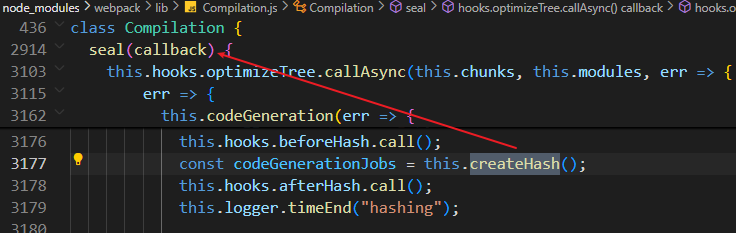
webpack 流程:文件生成
seal 阶段主要进行一系列优化工作,创建hash,以及将生成的资源挂载到 Compilation 的 assets 对象上,用于 emit 阶段输出到磁盘。
emit 输出阶段就是读取 Compilation 的 assets 对象,将资源输出到磁盘。
编写一个简易的webpack
前置知识
模块化:增强代码可读性和可维护性。
传统的网页开发转变成 Web Apps 开发,代码复杂度在逐步增高。
分离的 JS文件/模块,便于后续代码的维护性。
部署时希望把代码优化成几个 HTTP 请求。
常见的模块化方式:ES module、CJS、AMD。
import * as largeNumber from 'large-number';

const largeNumbers = require('large-number');

require(['large-number'], function (large-number) {
	// ...
	largeNumber.add('999', '1');
})
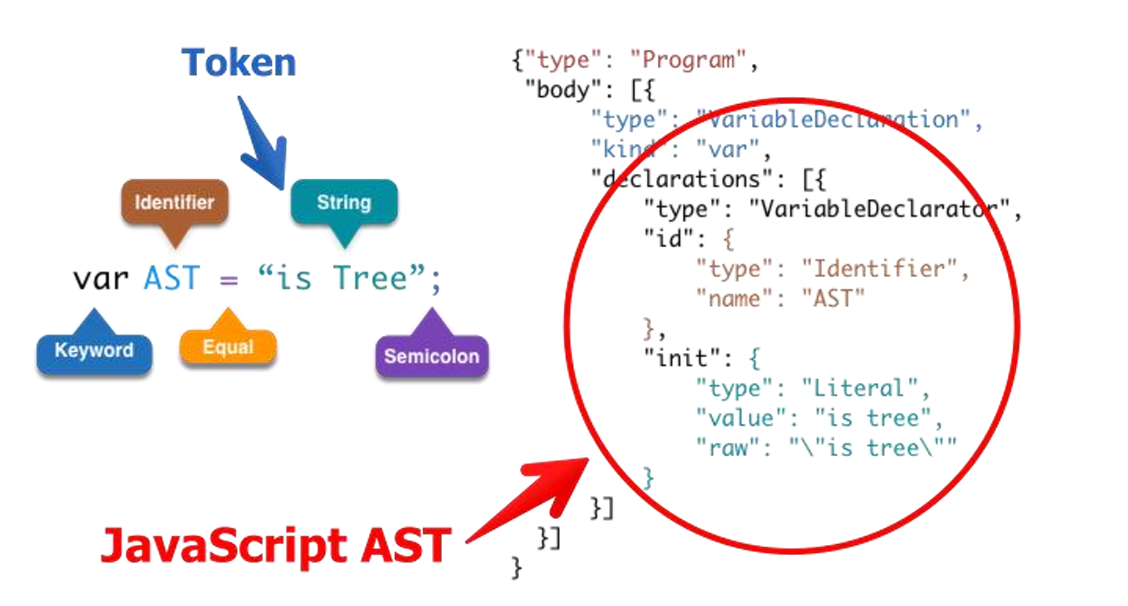
AST 基础知识:抽象语法树(abstract syntax tree 或者缩写为 AST),或者语法树(syntax tree),是源代码的抽象语法结构的树状表现形式,这里特指编程语言的源代码。树上的每个节点都表示源代码中的一种结构。
AST 应用场景:
模板引擎:常见模板引擎实现方式有,正则匹配;将模板引擎转换为字符串的流,字符串的流转换为 AST 进行分析,分析完成后,再转换为字符串。
ES6转为ES5,TS转为JS。
AST 在线转换网站:https://esprima.org/demo/parse.html。
实现简易webpack
目标:
1、可以将ES6语法转换成ES5语法。
通过 babylon 生成 AST。
通过 babel-core 将 AST 重新生成源码。
2、可以分析模块之间的依赖关系。
- 通过 babel-traverse 的 ImportDeclaration 方法获取依赖属性。
3、生成的js文件可以在浏览器中运行。
目录结构:
.
├── dist
│   ├── index.html # 测试HTML
│   └── main.js # 打包生成的文件
├── lib
│   ├── compiler.js # Compiler对象
│   ├── index.js # simplepack运行入口
│   └── parser.js # 定义解析函数
├── src
│   ├── greeting.js
│   └── index.js # 打包入口
├── .babelrc # babel配置文件
├── simplepack.config.js # simplepack 配置
└── package.json
simplepack.config.js 配置文件内容:
const path = require('path');

module.exports = {
  entry: path.join(__dirname, 'src/index.js'),
  output: {
    filename: 'main.js',
    path: path.join(__dirname, 'dist'),
  },
};
src/index.js 文件内容:
import { greeting } from './greeting.js';

document.write(greeting('bruce'));
src/greeting.js 文件内容:
// eslint-disable-next-line import/prefer-default-export
export function greeting(name) {
  return `hello ${name}`;
}
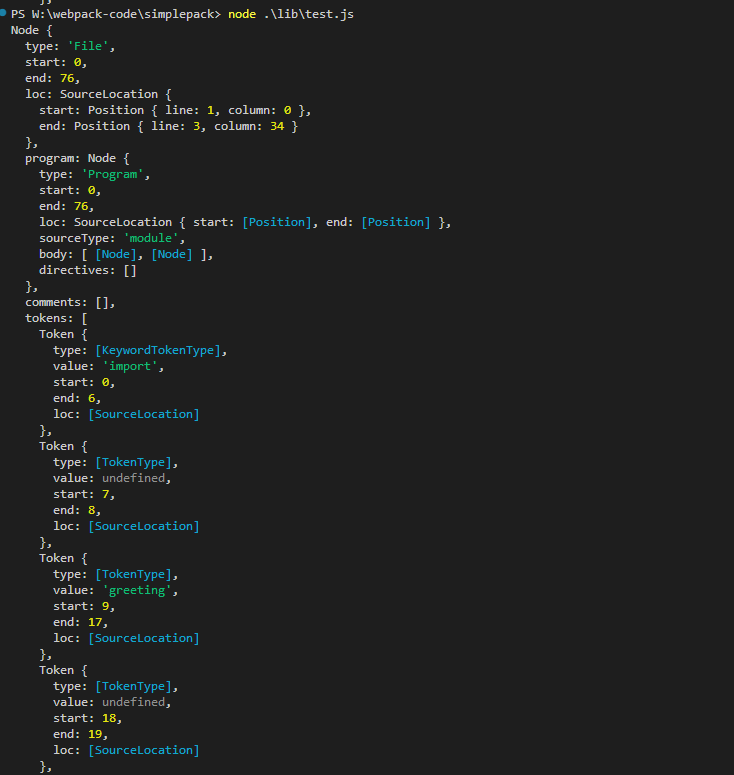
lib/parser.js 文件导出几个函数,负责如下几个事情:将源码转换为AST,分析依赖,将AST转为源码。
将源码转换为 AST 需要使用 babylon。
分析模块依赖需要使用 babel-traverse。
将 AST 转为源码的时候,还需要将 ES6 转为 ES5,需要借助 babel-core,还需要安装 babel-preset-env。
相关依赖如下:
"dependencies": {
	"babel-core": "^6.26.3",
	"babel-preset-env": "^1.7.0",
	"babel-traverse": "^6.26.0",
	"babylon": "^6.18.0"
}
/**
 * parser.js 主要功能
 * 将es6转为es5,将代码转为ast
 * 分析依赖
 */

const fs = require('fs');
const babylon = require('babylon');
const traverse = require('babel-traverse').default;
const { transformFromAst } = require('babel-core');

module.exports = {
  // 接收一个路径,将内容转换为AST
  getAST: (path) => {
    const source = fs.readFileSync(path, 'utf-8');

    return babylon.parse(source, {
      sourceType: 'module',
    })
  },

  getDependencies: (ast) => {
    const dependencies = [];

    traverse(ast, {
      // 怎么处理Import语句
      ImportDeclaration: ({ node }) => {
        // 获取节点的依赖
        dependencies.push(node.source.value);
      }
    })

    return dependencies;
  },

  // 将AST转为源码
  transform: (ast) => {
    const { code } = transformFromAst(ast, null, {
      // ES6的代码都能解析
      presets: ['env'],
    });

    return code;
  }
}
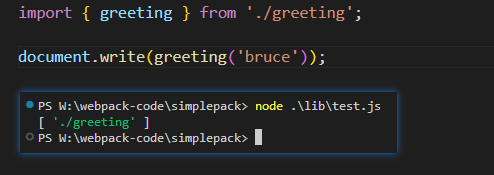
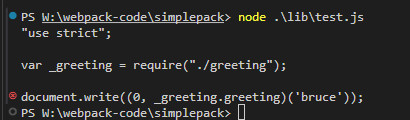
getAST、getDependencies、transform 三个函数的执行结果示例:
lib/index.js 文件是 simplepack 的执行入口,主要内容是调用 Compiler 的 run 方法。
const Compiler = require('./compiler');
const options = require('../simplepack.config');

new Compiler(options).run();
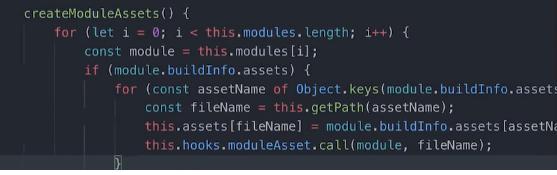
lib/compiler.js 文件是 Compiler 的执行入口,主要功能是调用 parser 的相关方法,从入口文件开始,将源码转换为 AST,分析依赖,将 AST 转为源码,最后生成打包后的内容。
/**
 * Compiler 主要负责模块构建和文件输出
 */

const { getAST, getDependencies, transform } = require('./parser');
const path = require('path');
const fs = require('fs');

module.exports = class Compiler {
  constructor(options) {
    const { entry, output } = options;
    this.entry = entry;
    this.output = output;
    this.modules = [];
  }

  run() {
    const entryModule = this.buildModule(this.entry, true);
    this.modules.push(entryModule);
    // 遍历所有依赖,递归构建所有依赖的依赖,就能得到所有模块
    this.modules.forEach((_module) => {
      _module.dependencies.forEach((dependency) => {
        this.modules.push(this.buildModule(dependency));
      });
    })
    // console.log(this.modules);

    this.emitFiles();
  }

  buildModule(filename, isEntry) {
    let ast;
    if (isEntry) {
      // 如果是入口文件,直接转换为AST
      // 入口模块要求是绝对路径,所以直接传入即可
      ast = getAST(filename);
    } else {
      // 如果不是入口文件,就是模块依赖
      // 先将相对路径转换为绝对路径,process.cwd()表示当前项目根目录
      const absolutePath = path.join(process.cwd(), './src', filename);
      ast = getAST(absolutePath);
    }
    return {
      filename,
      dependencies: getDependencies(ast),
      source: transform(ast),
    };
  }

  emitFiles() {
    const outputPath = path.join(this.output.path, this.output.filename);

    let modules = '';
    this.modules.forEach((_module) => {
			// 注意,这里是 +=,把内容连接成对象字符串,不是覆盖,最后要加一个逗号,隔开键值对
      modules += `'${_module.filename}': function (require, module, exports) { ${_module.source} },`;
    })

	// webpack 打包出来的内容是一个IIFE
	// 首先执行入口文件内容,遇到import的依赖,执行依赖文件内容,直到所有依赖都执行完,再执行入口文件内容
    const bundle = `(function(modules) {
      function require(filename) {
        var fn = modules[filename];
        var module = { exports: {}};
        fn(require, module, module.exports);
        return module.exports;
      }
        require('${this.entry}');
    })({${modules}})`;

    fs.writeFileSync(outputPath, bundle, 'utf-8');
  }
};
最终打包出来的内容如下所示,可以比较清晰地看出运行链路。
(function(modules) {
  function require(filename) {
    var fn = modules[filename];
    var module = { exports: {} };
    fn(require, module, module.exports);
    return module.exports;
  }
  require('W:\webpack-code\simplepack\src\index.js');
})({
  'W:\webpack-code\simplepack\src\index.js': function(require, module, exports) {
    "use strict";

    var _greeting = require("./greeting.js");

    document.write((0, _greeting.greeting)('bruce'));
  }, './greeting.js': function(require, module, exports) {
    "use strict";

    Object.defineProperty(exports, "__esModule", {
      value: true
    });
    exports.greeting = greeting;
    // eslint-disable-next-line import/prefer-default-export
    function greeting(name) {
      return "hello " + name;
    }
  },
})
评论留言
babel7 环境下,需要用 @babel/parser 替换 babylon,用 transformFromAstSync 替换 transformFromAst
这里的实现只是最简单的情况,如果
greeting.js文件再依赖其他文件,需要进行递归处理。我装的是
@babel/core "@babel/preset-env": "^7.10.2",
transform 里面是
transform(ast) {
  const { code } = transformFromAst(ast, null, {
		presets: ['@babel/env']
	});
	return code;
}
老师之所以装了 babel-preset-env 是 babel-core 因为版本不兼容了。
我全用的 7.0 也就不需要装 babel-preset-env 了